6. Writing A Command Bundle
At some point in your use of Cog, you’ll want to write some command bundles of your own. One of the promises of ChatOps is the ability to bring your processes into the shared space of your chat system, lowering the bar for collaboration, and increasing participation. Chances are you’ve already got a number of programs and scripts that you already use to run your systems. Fortunately, using those tools in Cog doesn’t require shoe-horning them into a particular application framework, or rewriting them into a new programming language. Instead, Cog’s interface relies on the fundamental building blocks of standard input, standard output, and environment variables.
In this chapter we’ll show you how to take a standalone program and gradually write adapter code to make it interoperate with Cog. We’ll examine Cog’s usage of input, output, and environment variables. We’ll learn how to describe a bundle to Cog. We’ll also see how to package your code and run it on Relay, Cog’s execution engine. Along the way, we’ll also discover what is necessary if you’d like to write your own language-specific interaction library to abstract the lower-level details of the Cog - command interaction.
Our framework for examining all these points will be the creation of a bundle that interacts with Twitter. For those wanting to skip ahead, the “real” version of this bundle can be found in Cog’s Command Bundle Warehouse. This chapter traces the techniques and thought processes a developer might go through to arrive at that finished product.
Warning
It is technically possible to write a Cog command in any language. However, certain languages are likely to provide poor performance due to particular details of their runtimes. You should generally favor languages that provide quick startup times. For example, commands written in JVM languages (Java, Clojure, Scala, etc.) will run slowly due to the relatively long startup of the Java Virtual Machine itself. This startup penalty will be incurred for each invocation of the command since Relay does not currently have a notion of a “persistent command”, whereby a “warm” JVM could be kept around and shared for multiple invocations.
At present, dynamic languages like Ruby and Python, or languages that compile down to performant executables, such as Go, Rust, etc., will give you the best experience with Cog.
6.1. Scenario: Tweet from Cog
Transparency during service incidents is essential to maintaining the trust of your users. When your API slows down, you experience a hardware failure, or have a service outage, your users will be affected. They need to know that you are aware of the problem, and they need to know that you’re working to remedy the situation.
Twitter is a popular platform for companies to quickly update their users on their system statuses. Wouldn’t it be nice if you could easily send a tweet from your company’s status account from your chat window as you and your colleagues work to remedy the situation? The people closest to the situation could quickly get the word out, without having to track down the person in the company that has the account’s login information.
Let’s imagine what that might look like:
Desired Interface for *twitter:tweet* Command.
@cog twitter:tweet Currently experiencing API slowdowns; investigating.
With a command like this, you and your colleagues could post status updates directly from chat. Of course, it would be useful for more than just status updates. For instance, you could also wire it up into pipelines and triggers to augment other workflows; perhaps you could automatically tweet when your CI system finishes a new product release? The brave among you could even create an alias to “OH” your colleagues’ witty observations. Sending a tweet is a very simple task, but by adding this simple task to Cog, you can unlock a number of incredibly useful abilities. How much moreso with the more sophisticated tools you already have?
6.2. Tweet from Plain Ruby
The first thing we need to do before we can send a tweet from Cog is
figure out how to send a tweet, period. To make things easy, we’ll take
advantage of the twitter Ruby gem
(https://github.com/sferik/twitter) and build our solution on top of it.
The complete code is shown in Command, Pure Ruby.
Note
For this example, we’re using Ruby for the heavy lifting of sending a tweet, but don’t be put off if you’re not a Ruby programmer. Thankfully, the code is short, and we’ll explain all the relevant points as we go on.
Since you can write Cog commands in any language, though, the specific details of Ruby aren’t all that important. The key points to pay attention to are the details of how Cog interacts with this code.
Note
If you’d like to follow along, you’ll need a Twitter account, as well as the required tokens to interact with the Twitter API. This will require creating an “application” under your account; go to https://apps.twitter.com to learn more. While you’re there, you’ll need to generate the following credentials:
- Consumer Key
- Consumer Secret
- Application Token
- Application Token Secret
tweet Command, Pure Ruby.
1 2 3 4 5 6 7 8 9 10 11 12 13 14 15 16 17 18 19 | #!/usr/bin/env ruby
require 'twitter'
client = Twitter::REST::Client.new(
consumer_key: ENV["TWITTER_CONSUMER_KEY"],
consumer_secret: ENV["TWITTER_CONSUMER_SECRET"],
access_token: ENV["TWITTER_ACCESS_TOKEN"],
access_token_secret: ENV["TWITTER_ACCESS_TOKEN_SECRET"])
message = ARGV.join(" ")
tweet = client.update(message)
puts <<-EOM
Message: #{message}
URL: #{tweet.url}
EOM
|
Annotations by line number:
Line 5 Here, we establish a connection to the Twitter API, using our API credentials, stored as environment variables.
Line 11 Next, we’ll assemble a message to send by combining all the command line arguments into a single string. This allows us to invoke our command like twitter:tweet this is a tweet, or twitter:tweet "this is a tweet". The former is often more convenient, but the latter is needed when the message contains special characters, like !.
Line 13 Here, we actually send the message to Twitter.
Line 15 Finally, we’ll return some information to standard output so we can find out the URL of our new tweet. There is other information we could add (like timestamp, tweet ID, etc.), but for now, we’ll keep it simple.
To make life easier, let’s create a Gemfile in our directory to
manage our dependencies. We’ll also use this later when we package our
bundle up.
Twitter Bundle Gemfile.
source 'https://rubygems.org'

gem 'twitter'
As you can see, it’s not a lot of code, and we can run it directly from our terminal, as seen in Executing the Pure Ruby tweet.
Executing the Pure Ruby ``tweet`` Command.
1 2 3 4 5 6 | bundle install
export TWITTER_CONSUMER_KEY=XXXX
export TWITTER_CONSUMER_SECRET=XXXX
export TWITTER_ACCESS_TOKEN=XXXX
export TWITTER_ACCESS_TOKEN_SECRET=XXXX
./tweet.rb This is an interesting tweet
|
Outputs:
Message: This is an interesting tweet
URL:     https://twitter.com/CogTesting/status/776507696396791809
Annotations by line number:
Line 1 We only need to install our dependencies once. Note also that bundle here refers to the Ruby dependency management tool Bundler, and not any Cog-specific executables. We’re not even using Cog yet!
Line 2 Substituting the appropriate values for our real credentials, of course.
By checking that URL, we can further verify that our command worked.

Our First Tweet
We now have a simple program to send a tweet, but we haven’t touched Cog just yet; we’ll begin to do that now.
6.3. First Steps Toward Cog: Arguments
Our tweet code is simple, and so getting it to run in Cog should also be pretty simple. With the code we have, we’ll need to take care of two things: arguments and our authentication tokens. We’ll tackle arguments first.
Recall our desired interface for our tweet command:
@cog twitter:tweet Currently experiencing API slowdowns; investigating
The string twitter:tweet is the name of our command, and everything
that follows is the message we’d like to send. If this were a
traditional terminal program, each word after twitter:tweet would be
an individual argument (“Currently”, “experiencing”, “API”, etc.). As
Cog commands are heavily influenced by the idioms and architecture of
the UNIX command line, it should come as no surprise to know that Cog
views these as arguments, as well.
In fact, if you have ever programmed in C before, the environment variables Cog uses to represent these arguments will look familiar.
COG_ARGC- COG ARGument Count = how many arguments were passedCOG_ARGV_0- COG ARGument 0 = the first argumentCOG_ARGV_1- COG ARGument 1 = the second argument
and so on.
Using the values of these environment variables, a command can
reconstruct the arguments in whatever form is most natural for its
implementation language (e.g., as an array, a vector, etc.). Though it’s
not hard to write that code, it can be tedious to do it more than once;
this is where the use of language-specific libraries can be useful;
we’ll take a look at cog-rb, the Ruby library for Cog commands a bit
later.
There are two approaches we can take to get these Cog environment
variable consumed properly by our code. We could edit our Ruby code to
directly interface with Cog, assembling the message from the
COG_ARG_* variables instead of from ARGV. Alternatively, we
could put this logic into an adapter script that translates between the
interfaces of Cog and our tweet program. The former approach may be more
useful for very small or simple programs that will only be used via Cog,
while the latter can be more desirable for larger and more complex
programs, programs where the source code is not readily accessible, or
for programs that still need to be usable outside of a Cog context (see
Tip: Advantages of Adapters for more on this).
As the adapter script approach is more flexible and more clearly
illustrates the underlying mechanics of the Cog interface, that is the
approach we’ll take now. Let’s pretend that tweet.rb is a program
that we have been using for years in our company, and that we would now
like to interface with Cog, without rewriting it.
(Later in the chapter, once we’ve gotten a better feel for how Cog commands work, we’ll add another command using the more direct approach.)
For the time being, we’ll continue to run our command directly in a terminal, and not through Cog. This will allow us to focus on only the Cog / command interface, without also having to introduce command bundle packaging, bundle installation, and other details. We will, of course, introduce all those concepts and more in time, but for now, the following code is Cog to our nascent command.
Run Our Command from the Command Line.
1 2 3 4 5 6 7 8 9 10 | export TWITTER_CONSUMER_KEY=XXXX
export TWITTER_CONSUMER_SECRET=XXXX
export TWITTER_ACCESS_TOKEN=XXXX
export TWITTER_ACCESS_TOKEN_SECRET=XXXX
export COG_ARGC="2"
export COG_ARGV_0="Hello"
export COG_ARGV_1="World"
./tweet_cog_wrapper.sh
|
Annotations by line number:
Line 6 Here, we introduce Cog’s environment variables into our runner
script. This would correspond to @cog twitter:tweet Hello World
in our chat provider. Cog will parse the Hello World message as
two separate arguments.
Line 10 Instead of calling our Ruby code directly, we introduce a new adapter script to process the Cog environment variables.
Our Cog command is shown in tweet_cog_wrapper.sh
Remember, this is acting as an adapter that allows us to call our
original tweet.rb script from Cog. We are not changing tweet.rb
at all. This adapter script is the only thing that is aware of Cog.
tweet_cog_wrapper.sh.
1 2 3 4 5 6 7 8 9 | #!/bin/bash
declare -a ARGUMENTS
for ((i=0;i<${COG_ARGC};i++)); do
var="COG_ARGV_${i}"
ARGUMENTS[$i]=${!var}
done
./tweet.rb ${ARGUMENTS[*]}
|
Annotations by line number:
Line 3 We need to pull out the COG_ARGV_* variables to pass as actual
arguments to our Ruby script. Here, we loop as determined by the
COG_ARGC variable, placing each COG_ARGV_* variable into a Bash array in turn.
Line 9 With the pieces of our message extracted from the environment, we can
now call our Ruby script just as we have previously, passing the
arguments as actual arguments. Compare this to the invocation of
tweet.rb in Executing the Pure Ruby tweet.
When we execute our command in the terminal, it works as expected.

Hello World
Believe it or not, we’re now ready to start packing this up for Cog. There’s more to Cog commands than arguments, of course, but we’re now at a point where we can actually run what we have in Cog!
Tip
In Run Our Command from the Command Line, you might have wondered why Cog would go to the trouble of turning the arguments
hello world
into the environment variables
COG_ARGC=2
COG_ARG_0=hello
COG_ARG_1=world
only to have our command turn those environment variables back into arguments that our Ruby code can process.
While each computer language has its own conventions and idioms, they all have ways to read environment variables (and consume standard input and write to standard output, which we’ll address soon.) By basing its interaction model on universal components like environment variables, Cog places no restrictions on what language commands are written in. There are no “blessed” languages for Cog commands; you can write commands in Fortran, COBOL, or Forth just as readily as you can in Ruby or Python. It is completely transparent to Cog.
Tip
Earlier, we briefly mentioned some reasons why you might want to write an adapter script to interface Cog with existing tools you may already use. We’ll examine some of those reasons more in depth here. These reasons are not mutually exclusive; more than one may be applicable in any given situation.
- Proper Separation of Concerns
If you have code that already performs a task well, editing it to also become aware of Cog calling conventions can violate the Single Responsibility Principle and make the code more complex and harder to maintain. Isolating the Cog interaction in an adapter can yield software that is easier to maintain and test.
- Source Code is Not Required
You may wish to expose some software to Cog that you either do not have the source code for, or for which altering the source code may be impractical. By using an adapter, you can control how the executable is called.
- Tools Must Remain Usable Outside of Cog
Some tools that you wish to use with Cog may also need to be usable outside of Cog. In this case, changing the code to use Cog’s calling conventions may make use outside of Cog inconvenient and unwieldy (imagine invoking such a command with four arguments, for instance). Using an adapter allows Cog to call it, but also retains the more familiar calling interface for existing users of the tools.
- Limit Capabilities Exposed to Chat
You may have existing tools with some features you would like to use in chat, but others that are perhaps too dangerous, inapplicable, or inappropriate for a chat context. By using an adapter, you can limit what capabilities are made available to Cog.
6.4. Describe it to Cog: Bundle Definitions
All Cog commands reside in a bundle, which is a collection of related commands, along with metadata describing them. Right now, we have the makings of a single-command bundle.
All bundles are described by a YAML file, which gives Cog all the
information it needs to properly interact with their commands. Let’s
take a look at a minimal bundle definition file for our new twitter
bundle.
Tip
Bundle definition files are conventionally named config.yaml;
the actual name is irrelevant to Cog, however.
Minimal ``config.yaml`` Bundle Definition.
1 2 3 4 5 6 7 8 9 10 11 12 13 | ---
cog_bundle_version: 4
name: twitter_example
description: Interact with Twitter
version: 0.0.1
commands:
tweet:
description: Send a tweet!
executable: /Users/chris/cog-book/tweet_cog_wrapper.sh
arguments: "<message>"
rules:
- allow
|
Annotations by line number:
Line 2 Every bundle must declare which bundle definition schema version it
uses. This determines which fields are expected, how their values are
validated, and so on. At the time of writing, the current version is
4.
Line 3 Every bundle must have a name. These must be unique within a Cog installation.
Line 4 While not strictly required, it is a good practice to include a brief description of the bundle. This will be displayed when listing bundles that are installed on a Cog system, helping users discover which commmands are available.
Line 5 This version pertains to the bundle definition artifact itself. Multiple versions of a bundle may be installed on a Cog system at one time, though only one may be active.
Line 6 In order for Cog to recognize a command, it must be described here in
the commands section. The keys of this map are the command names,
and the values are objects providing metadata about the command.
Line 9 The path to the actual program that contains the command logic. This is what we are writing!
Line 10 Though not required, describing the inputs your command takes is always a good idea.
Line 12 Cog has a comprehensive authorization system that allows you to
define rules that govern who may execute a command. We’ll explore
this further in a bit, but for now, just remember that the special
allow rule means that any Cog user will be able to execute this
command.
Now that we’ve described our bundle, we need to upload this definition file to Cog.
6.5. Installing the Bundle
Once we have written bundle definition file, we need to load it into
Cog. We’ll use cogctl:
Installing a Bundle: The Quick Way.
cogctl bundle install config.yaml --enable --relay-group=default
Here, we do several things at once. First, we upload the contents of our
bundle definition to Cog. By adding the --enable flag, we also make
the described bundle active. Cog will accept invocations for commands
within the bundle and attempt to dispatch them; additionally, if any
other versions of this bundle were previously available and enabled,
this would ensure that the version we just uploaded was the active one.
Finally, we associate the bundle with one or more relay groups, which
governs which Relay servers will be responsible for satisfying requests
targeted at this bundle.
This is equivalent to:
Installing a Bundle: The Verbose Way.
cogctl bundle install config.yaml
cogctl bundle enable twitter_example 0.0.1
cogctl relay-group assign default twitter_example
If you look back at our bundle definition, you’ll notice that the path to the executable is on my workstation. When a Relay gets the request to run the command, it will look at this path, which means that we’ll need to ensure that the Relay has all the requisite files installed before a command will actually execute. For the purposes of demonstration, we’ll be running a Relay on the workstation, but for real world usage, you’ll want to take measures to install the needed files in the correct place. Tools like Chef, Puppet, or Ansible can help with this.
TODO: Need to better describe a bundle development setup, either with a Relay running locally, or with a Relay running in Docker.
TODO: I wanted to illustrate that a “native” bundle is possible, and possibly emphasize the “changes are live immediately” aspect of this. The new dev mode on Relay may make this more of a moot point, though.
In a bit we’ll update our bundle to use Docker, which greatly simplifies bundle installation and maintenance.
TODO: Additional docs about how to start Cog, Relay, etc.
Once the bundle is installed, we can finally run it from chat!
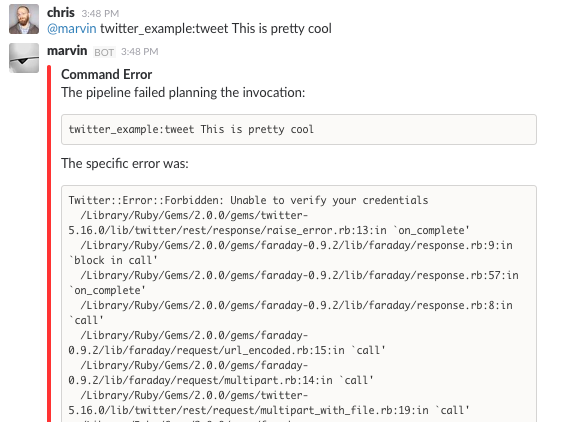
First Time Running the tweet Command from Cog
Oh no! It looks like we can’t authenticate with Twitter. But we’ve still got our credentials in the environment, don’t we?
6.6. Dynamic Configuration
Actually, we don’t have our credentials in the environment anymore,
mainly because we’re now running the command under Relay and not our
runner script. When a command is executed by Relay, it injects variables
into the environment that each command receives. This is how
COG_ARGC, COG_ARGV_0, etc. get into place. Relay can also be
configured to inject additional arbitrary values into the environment as
well, but these will be global, applying to every single command
invocation that Relay services. While you could add the variables our
tweet command is expecting to your Relay configuration, this would
create a huge security hole; every command would have access to your
Twitter credentials! Over time, this approach would also become rather
difficult to maintain as you added more bundles. Adding environment
variables like this to your global Relay configuration is a Really Bad
Idea, and we shall speak of it no further.
Tip
We’ve established that adding environment variables containing
authentication tokens, passwords, and other secrets that individual
commands need to Relay’s global configuration is a bad idea. Any
variables you add to this configuration should genuinely be global.
Some examples include ensure that certain supporting files are
available on the PATH, or that necessary libraries are on the
search paths of whatever language runtimes you might be using.
Instead, we’ll let Cog manage these environment variables for us. This
way, the only commands that will get our Twitter authentication tokens
will be commands in our twitter_example bundle. We can also quickly
change the values centrally in Cog, and they will take effect across all
Relays almost instantly. We can even create “layered” configurations,
dynamically changing the values based on the user that invokes a
command, the chat room from which they invoke it, or a combination of
both. For now, though, we’ll just deal with the simple case.
Let’s create another YAML file to contain your environment variables
(substituting XXXX with your real tokens, of course):
Dynamic Configuration.
---
TWITTER_CONSUMER_KEY: XXXX
TWITTER_CONSUMER_SECRET: XXXX
TWITTER_ACCESS_TOKEN: XXXX
TWITTER_ACCESS_TOKEN_SECRET: XXXX
TODO: Need to mention starting up Relay in managed config mode here.
This file is a simple map whose keys are the environment variable names
that the command expects (compare these to our original tweet.rb
file), and whose values are the, well, values those variables should
have. Remember that the values will be presented to your code as strings
(like all environment variables); if your code expects different data
types (integers, floats, booleans, etc.), you’ll need to handle that
translation on your own (though this is another thing that
language-specific libraries could potentially handle for you).
Uploading this file to Cog requires another cogctl invocation.
Uploading Dynamic Configuration to Cog.
cogctl bundle config create twitter_example dynamic_configuration.yaml
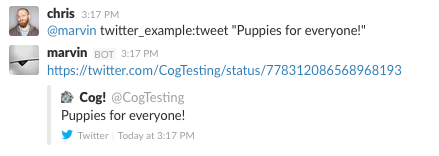
Now, we should be able to run our command completely within Cog.
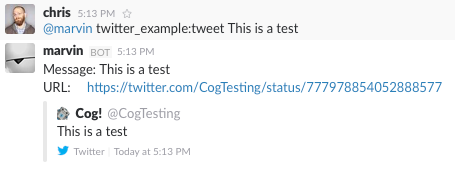
Successful Execution of the tweet Command from Cog
Success! Cog has captured the output of our tweet command and presented it it in our chat client (Here, we’re using Slack; the fancy tweet display is due to Slack’s handling of URLs, and is not something specific to Cog).
We could declare victory here, but Cog can do more than just parrot standard output back to chat. If we structure the output our command returns to Cog, we can unlock richer output formatting, as well as make the output more easily accessible to any downstream commands in a pipeline.
6.7. Output
As we saw above, the standard output of a command gets returned back to Cog and output in chat. Pipelines and most templates in Cog act on JSON object inputs, though, not arbitrary text like traditional Unix pipelines do. By structuring the output a bit, we can make our data much more useful.
Let’s update our adapter script to generate structured output.
tweet_cog_wrapper.sh with structured output.
1 2 3 4 5 6 7 8 9 10 11 12 13 14 15 | #!/bin/bash
declare -a TWEET_ARGUMENTS
for ((i=0;i<${COG_ARGC};i++)); do
var="COG_ARGV_${i}"
TWEET_ARGUMENTS[$i]=${!var}
done
output=$(bundle exec $(dirname ${0})/tweet.rb ${TWEET_ARGUMENTS[*]})
message=$(echo "$output" | grep "Message: " | cut -d":" -f2 | sed -e 's/^ *//')
url=$(echo "$output" | grep "URL: " | sed -e 's/^URL: *//')
echo "JSON"
echo "{\"message\": \"${message}\", \"url\": \"${url}\"}"
|
Annotations by line number:
Line 9 Instead of returning the standard output directly to Cog, we’ll capture it in our adapter script to perform some post-processing.
Line 11 Here, we use common Unix utilities to extract our tweet message and URL from the output. You can use whatever tools you like for this.
Line 14 If the output contains the string "JSON" on a line by itself,
followed by a newline, the remainder of the output is treated as
JSON. Here, we manually create a JSON version of the plain text
output we were originally returning. Of course, you can generate JSON
in any number of ways; we’re taking the manual route here for
demonstration purposes, and because the object itself is so simple.
The JSON tag in our output is a “command response attribute”, one of
several that can be used by commands. We’ll touch on a few more in this
chapter; for more details, see Command Output Tags. The
upshot is that when Relay detects these response attributes in a
command’s output, it interprets them as special instructions on how to
handle that output. The JSON tag is probably the most commonly used
one.
Now, when we run our command through Cog, our output looks very different.
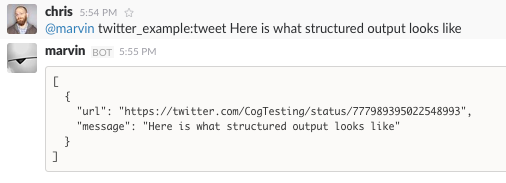
Structured Command Output
We now see a pretty-printed version of our JSON in chat. Because we’ve added structure, downstream commands can use our output, like so:

Extracting Data from Structured Command Output
6.7.1. Templating Output
As interesting as pretty-printed JSON output is, it can be cumbersome to deal with in chat. Though this particular command’s output is not so bad, imagine dealing with a large JSON object with 50 keys and non-scalar values. It would be difficult to visually parse, and the size of it alone would obscure the actual human conversations happening, largely nullifying the benefits of “doing chatops” in the first place. Favoring more complete outputs is good for maximum flexibility in pipelines, but humans rarely need to see all that data to get the situational awareness they need.
In order to address this, Cog commands can specify that their output be rendered through a template, allowing Cog to present the most salient information to humans, formatted by the conventions of your chat client. Cog templates are written using Greenbar, a templating language written by Operable to satisfy the needs of Cog. It’s probably best described as a Markdown variant with support for ERB-like tags.
The time has come to add a template to our bundle. Here is what ours will look like:
Greenbar ``tweet`` Template.
~each var=$results~
~$item.url~
~end~
TODO: why iterate over $results?
Given what we saw in the output before, we probably really only care about the new tweet’s URL. Modern chat platforms will generally display the tweet for us based on that URL, and in any event, you can always click that URL if you want to see the tweet. Our template here simply extracts the URL from the JSON object our command now returns.
Note
Templates are only used for formatting the final output of a pipeline for human consumption. If a command is not the last one in a pipeline, any template information is ignored. Templates do not “filter” the output as it flows through a pipeline.
To make the template available to Cog, we must add it to our bundle definition file.
Adding Templates to the Bundle Definition.
1 2 3 4 5 6 7 8 9 10 11 12 13 14 15 16 17 18 | ---
cog_bundle_version: 4
name: twitter_example
description: Interact with Twitter
version: 0.0.2
commands:
tweet:
description: Send a tweet!
executable: /Users/chris/cog-book/tweet_cog_wrapper.sh
arguments: "<message>"
rules: [ 'allow' ]
templates:
tweet:
body: |
~each var=$results~
~$item.url~
~end~
|
Annotations by line number:
Line 5 Note that we have updated the version of the bundle. You must do this if you want to upload a new definition with a new template, new command, or otherwise altered metadata.
Line 12 Here we have a new top-level section of the bundle: templates.
The keys of this map are the names of templates, while the values are
objects whose body key stores the literal text of the template.
Once we install this bundle there’s one more modification we must make to our adapter script. We must somehow inform Cog which template it should use to format the output of the command. The solution is similar to how we instructed Cog to treat our output as JSON: we’ll use a command response attribute.
Specifying a Template in a Command.
1 2 3 4 5 6 7 8 9 10 11 12 13 14 15 16 | #!/bin/bash
declare -a TWEET_ARGUMENTS
for ((i=0;i<${COG_ARGC};i++)); do
var="COG_ARGV_${i}"
TWEET_ARGUMENTS[$i]=${!var}
done
output=$(bundle exec $(dirname ${0})/tweet.rb ${TWEET_ARGUMENTS[*]})
message=$(echo "$output" | grep "Message: " | cut -d":" -f2 | sed -e 's/^ *//')
url=$(echo "$output" | grep "URL: " | sed -e 's/^URL: *//')
echo "COG_TEMPLATE: tweet"
echo "JSON"
echo "{\"message\": \"${message}\", \"url\": \"${url}\"}"
|
Annotation by Line Numbers:
Line 14 An output line that begins with COG_TEMPLATE: is a special
command response attribute; whatever follows on that line is the name
of a template in that command’s bundle that should be used for
formatting. Our template is called “tweet”, as defined in our bundle
definition YAML templates section.
Bundles may include many templates, and since a command programmatically
indicates which template to use, any single command may actually use
more than one template (e.g., based on the result of this invocation,
use template x, but use template y if some other result is
generated). For any given output, however, only one template may be
used.
Running the command again in our chat client shows us the template in action.
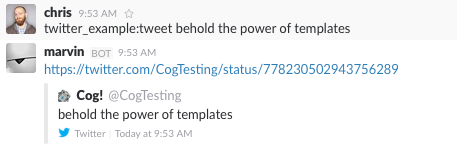
Output Formatted with a Simple Template
Here we see the output from Cog is just the tweet’s URL, and not raw JSON.
Note
Earlier, we mentioned that “most” templates operate on structured
JSON input. There is one template (named “text”) built into Cog
itself that takes unstructured text. This is automatically used when
Cog detects unstructured text output. It simply turns the text into
an array of strings (one for each line of output), and wraps it in a
JSON object with the text stored under a body key. In this way,
Cog maintains the uniform interface for command input and output.
Tip
If you really do want to see the raw JSON output of a pipeline,
instead of the templated output, simply pipe the results through the
operable:raw command.
6.8. Tweet Permissions and Rules
Earlier, we entirely bypassed the notions of permissions and
authorization rules for our tweet command. We were focused more on
figuring out how to make our command work; adding Cog’s authorization
system into the mix would potentially complicate things.
Now that our command works, however, it’s time to revisit. While sending a tweet from chat can be useful, we may not want everybody with access to our chat system to be able to send a tweet from our account.
Let’s make it so only a subset of users will be able to send a tweet.
We’ll add a twitter_example:tweet permission to the bundle, as well
as a rule for the command.
Adding Permissions and Rules to the Bundle.
1 2 3 4 5 6 7 8 9 10 11 12 13 14 15 16 17 18 19 20 21 | ---
cog_bundle_version: 4
name: twitter_example
description: Interact with Twitter
version: 0.0.3
permissions:
- twitter_example:tweet
commands:
tweet:
description: Send a tweet!
executable: /Users/chris/cog-book/tweet_cog_wrapper.sh
arguments: "<message>"
rules:
- must have twitter_example:tweet
templates:
tweet:
body: |
~each var=$results~
~$item.url~
~end~
|
Annotations by line number:
Line 5 We’re adding to the bundle, so we bump the version
Line 7 A new permissions key holds a list of permissions used across the
entire bundle. Customarily, there is a permission for each command.
Line 14 We replace our “allow” rule with a new one that states that anyone
excuting our tweet command must have been granted the
twitter_example:tweet permission.
Once we’ve installed this new version, let’s try it out.
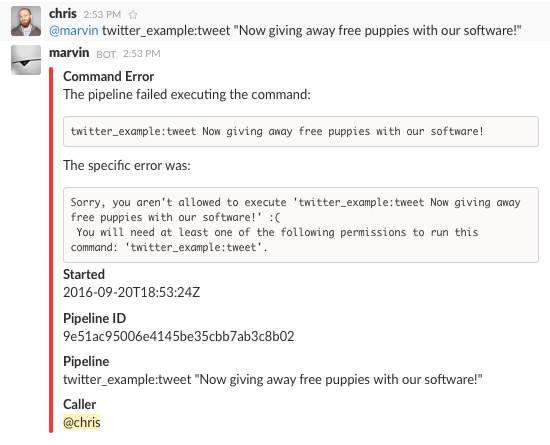
Permission Denied
Looks like I don’t have permission to send tweets anymore! (Probably for the best; distributing puppies along with open source software sounds like a logistical nightmare.) This is expected, though. We just restricted who can run our command, but didn’t grant anybody permissions. In fact, at this stage, no Cog users in this system could execute this command. This is why it is actually safe to include default authorization rules within bundle. Bundle rules may only reference bundle permissions, and until someone has been granted those permissions, Cog will deny execution of the restricted commands. This allows administrators to roll out use of commands to users at their leisure.
Each command in a bundle may have multiple rules specified; when a user
invokes a command with multiple rules, only one of them needs to match
for the user to be able to execute the command. Bundles may contain a
mix of commands that are restricted by authorization rules and commands
that are unrestricted (i.e., have a rule of allow).
After granting myself the permission (I am an administrator on my own system):
Granting Permissions.
@cog permission grant twitter_example:tweet cog-admin
I’m once again able to tweet.
Permission Granted
Whoever let me tweet from the company account clearly exhibited poor judgement.
At this point, we’ve brought our original tweet.rb script into Cog.
We glossed over some points earlier, but have a good foundation in the
basics now. Let’s circle back to touch on those points now, as we expand
the capabilities of our bundle.
6.9. Options: Tweet from different accounts
We’ve seen how to deal with arguments in a Cog command, but they can also have options as well. Let’s see how they are represented as we add the ability to tweet from multiple accounts to our command.
Always tweeting from the same account, while useful, can be a bit
limiting. If you have both a status account and a marketing account, you
very well may want to tweet from either one using Cog. We can add this
ability to our command by adding a new option; let’s call it --as.
Here’s what we want it to look like:
Tweeting from Different Accounts: Desired Interface.
@cog twitter_example:tweet --as=status "All systems are normal"
@cog twitter_example:tweet --as=marketing "We shipped version 1.0.0!"
(You could call the option something like --account if you like, but
--as reads nicely.)
To support this, we’ll need to be sure that the authentication tokens
for each account are available to the command. Based on the value of the
--as option, we can then select which of these sets of tokens we’ll
actually use. If no --as option is supplied, we can fall back to a
default account.
Let’s take a look at how our dynamic configuration for this bundle will need to change.
Updated Dynamic Configuration for Multiple Twitter Accounts.
1 2 3 4 5 6 7 8 9 10 11 12 | ---
TWITTER_DEFAULT_ACCOUNT: STATUS
TWITTER_CONSUMER_KEY_STATUS: XXXX
TWITTER_CONSUMER_SECRET_STATUS: XXXX
TWITTER_ACCESS_TOKEN_STATUS: XXXX
TWITTER_ACCESS_TOKEN_SECRET_STATUS: XXXX
TWITTER_CONSUMER_KEY_MARKETING: YYYY
TWITTER_CONSUMER_SECRET_MARKETING: YYYY
TWITTER_ACCESS_TOKEN_MARKETING: YYYY
TWITTER_ACCESS_TOKEN_SECRET_MARKETING: YYYY
|
Annotations by line number:
Line 2 We introduce a new variable indicating which set of credentials to
use if no --as option is supplied.
Line 4 We have changed the names of the environment variables by adding a
suffix. This set will be used when the value of --as is “STATUS”.
Line 9 We can add as many sets of credentials as we wish to support; as long as the variable names have distinct suffixes, everything is fine.
Next, let’s see how our bundle definition needs to change to add this option.
Adding Options to a Command.
1 2 3 4 5 6 7 8 9 10 11 12 13 14 15 16 17 18 19 20 21 22 23 24 25 26 27 | ---
cog_bundle_version: 4
name: twitter_example
description: Interact with Twitter
version: 0.0.4
permissions:
- twitter_example:tweet
commands:
tweet:
description: Send a tweet!
executable: /Users/chris/cog-book/tweet_cog_wrapper.sh
arguments: "<message>"
rules:
- must have twitter_example:tweet
options:
as:
description: the account to tweet from
type: string
required: false
short_flag: a
templates:
tweet:
body: |
~each var=$results~
~$item.url~
~end~
|
Annotations by line number:
Line 5 Again, we bump the version of our bundle
Line 15 Each command can have an options map; the keys are the option’s
“long name”, and the value object describes additional metadata about
the option.
Finally, we modify our adapter script now to see how to access this option.
Access Option Values in a Command.
1 2 3 4 5 6 7 8 9 10 11 12 13 14 15 16 17 18 19 20 21 22 23 24 25 26 27 28 29 30 | #!/bin/bash
declare -a TWEET_ARGUMENTS
for ((i=0;i<${COG_ARGC};i++)); do
var="COG_ARGV_${i}"
TWEET_ARGUMENTS[$i]=${!var}
done
if [ -n "${COG_OPT_AS}" ]
then
account=${COG_OPT_AS}
else
account=${TWITTER_DEFAULT_ACCOUNT}
fi
account=$(echo $account | tr '[a-z]' '[A-Z]')
export TWITTER_CONSUMER_KEY=$(eval "echo \$$(echo TWITTER_CONSUMER_KEY_${account})")
export TWITTER_CONSUMER_SECRET=$(eval "echo \$$(echo TWITTER_CONSUMER_SECRET_${account})")
export TWITTER_ACCESS_TOKEN=$(eval "echo \$$(echo TWITTER_ACCESS_TOKEN_${account})")
export TWITTER_ACCESS_TOKEN_SECRET=$(eval "echo \$$(echo TWITTER_ACCESS_TOKEN_SECRET_${account})")
output=$(bundle exec $(dirname ${0})/tweet.rb ${TWEET_ARGUMENTS[*]})
message=$(echo "$output" | grep "Message: " | cut -d":" -f2 | sed -e 's/^ *//')
url=$(echo "$output" | grep "URL: " | sed -e 's/^URL: *//')
echo "COG_TEMPLATE: tweet"
echo "JSON"
echo "{\"message\": \"${message}\", \"url\": \"${url}\"}"
|
Annotations by line number:
Line 9 Here we test to see if there is a value for the COG_OPT_AS
variable. All option values are presented this way, using the
uppercased “long name” of the option (thus a “foo” option would be
accessed as COG_OPT_FOO, etc.) A COG_OPTS variable is also
supplied, the value of which is a comma-delimited list of options
present for the invocation. This is used to indicate which
environment variables need to be checked. For our adapter script,
however, which is coded specifically for this one-option command,
COG_OPTS does not provide much benefit.
Line 15 We’ll just uppercase the account identifier, which creates a more pleasing user experience; it’s easier to type “–as=status” than “–as=STATUS”, after all.
Line 17 Based on the account we want to use, we’ll set the environment variables our command expects to their appropriate values.
Observe again that we haven’t touched our underlying Ruby script at all since we initially wrote it.
Let’s take a look at it in action.
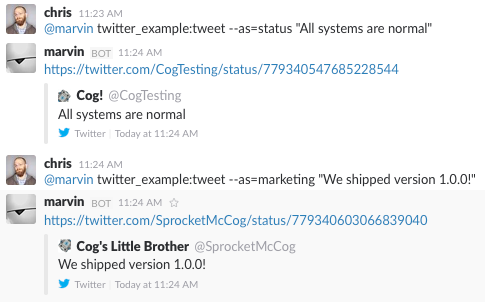
Tweeting from Multiple Accounts
6.10. Packaging with Docker
Up until now, we’ve been installing our command executable on the Relay directly. While this is sometimes convenient, you often want automation for deploying commands. While you can use automation tools like Chef, Puppet, or Ansible to do this, Relay also has built-in support for deploying bundles as Docker containers. In fact, as long as your container repository is accessible by your Relay server, all you need to do to completely install a bundle is to upload the definition YAML file to Cog, and everything else is taken care of for you. We’ll package up our bundle into a Docker container now.
Note
A full explanation of Docker is beyond the scope of this chapter. For resources, please visit https://www.docker.com.
We’re shooting for a minimal container here, so we’re building on Alpine Linux, a lightweight distribution based on BusyBox.
Packaging our Bundle with Docker.
FROM alpine:3.4

RUN apk --no-cache add bash build-base ca-certificates \
                       ruby ruby-dev ruby-bundler ruby-io-console

RUN adduser -D bundle
USER bundle
WORKDIR /home/bundle
COPY . /home/bundle

RUN bundle install --path .bundle
After a bit of experimentation, we’ve narrowed down our system dependencies to the minimum needed to run our command. We also create a bundle user, copy our existing code into that user’s home directory, and install our code dependencies.
Creating the image is simple.
Building the Bundle Image.
docker build -t cog-book/twitter .
Now we need to tell Cog that this bundle is a Docker bundle, and which image should be used to run it.
Linking a Bundle to a Docker Image.
1 2 3 4 5 6 7 8 9 10 11 12 13 14 15 16 17 18 19 20 21 22 23 24 25 26 27 28 29 30 | ---
cog_bundle_version: 4
name: twitter_example
description: Interact with Twitter
version: 0.0.5
docker:
image: cog-book/twitter
tag: latest
permissions:
- twitter_example:tweet
commands:
tweet:
description: Send a tweet!
executable: /home/bundle/tweet_cog_wrapper.sh
arguments: "<message>"
rules:
- when command is twitter_example:tweet must have twitter_example:tweet
options:
as:
description: the account to tweet from
type: string
required: false
short_flag: a
templates:
tweet:
body: |
~each var=$results~
~$item.url~
~end~
|
Annotations by line number:
Line 5 Bump the version; you know the drill by now
Line 6 Docker-enabled bundles have a docker configuration section,
indicating exactly which container should be used. We use the same
image name that we built our Dockerfile with. Specifying “latest” for
the tag will cause Relay to pull the most recent version of the image
when running the commmands from the bundle. This is useful for local
development, and potentially for other specialized use cases, but for
a proper release, you’ll want to both build your image with a
specific tag, and also lock your bundle to that tag.
Line 14 We’ve changed the path to the executable. This is from inside the container, so it needs to match up with where the code was installed when the image was built.
Once we install it, we can see from Relay’s logs that it has been notified and is downloading the image:
Retrieving the Bundle Image in Relay’s Logs.
DEBU[2016-09-21T12:22:06-04:00] Refreshing command catalog.
DEBU[2016-09-21T12:22:06-04:00] Processing bundle catalog updates.
DEBU[2016-09-21T12:22:06-04:00] Updating bundle catalog. Adds: 1, Deletions: 1.
DEBU[2016-09-21T12:22:07-04:00] Retrieving cog-book/twitter:latest from upstream Docker registry.
DEBU[2016-09-21T12:22:08-04:00] Retrieved cog-book/twitter:latest from upstream Docker registry.
INFO[2016-09-21T12:22:08-04:00] Docker image 21b2b516883 for cog-book/twitter:latest is up to date.
INFO[2016-09-21T12:22:08-04:00] Changes to bundle catalog detected.
DEBU[2016-09-21T12:22:08-04:00] Called relayAnnouncer.SendAnnouncement()
DEBU[2016-09-21T12:22:08-04:00] Preparing announcement
DEBU[2016-09-21T12:22:08-04:00] Publishing bundle announcement to bot/relays/discover
DEBU[2016-09-21T12:22:08-04:00] Announcement sent.
INFO[2016-09-21T12:22:08-04:00] Cog successfully ack'd bundle announcement 2.
And it works!
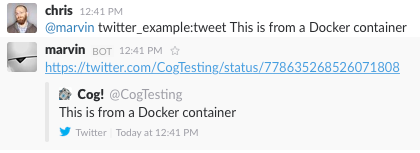
Using a Docker-packaged Command
6.11. Handling Input
We’ve got a nice little bundle going here, but amazingly, we’ve not really gotten into one of Cog’s more exciting features: pipelines!
In Extracting Data from Structured Command Output, we saw a basic pipeline
where we explicitly pulled out the message field from our tweet
command’s output to use in the following echo command invocation.
When you do this, Cog itself handles the extraction, and your commands
don’t have to know anything about how the prior output was structured;
after all, it would be a bit odd for the echo command — something
built into Cog — to know how a tweet result was structured,
particularly since we just wrote it. This is very important for being
able to chain together commands from a variety of different bundles.
However, a bundle will often include multiple commands which may operate on a common structure. In this case, it can be convenient to have the commands operate on the implicit input received from a previous pipeline stage. This data is presented to the command as a JSON string on standard input. With this, you can create some rather concise pipelines. Let’s examine how this works in practice by introducing a few more commands to our bundle.
6.11.1. Usecase: Getting Statistics on Recent Tweets
Let’s say you’ve just announced the release of version 1.0 of your software product on Twitter with a series of tweets, and you’re curious to see what kind of traction they’ve been getting in terms of favorites and retweets.
Now, you might be tempted to make some sort of
‘recent_tweets_with_stats` command, or (slightly better) perhaps a
recent_tweets command that takes a --with-stats option. That’s
all well and good, but consider how people might want to take advantage
of this functionality in the future. Perhaps your support team would
like to view those same statistics for the tweets that are directed to
your support account. Maybe your marketing team wants to see those
statistics for the tweets that mention your product. If you baked the
statistics feature into your recent_tweets command, you’d need to
duplicate it for a mention command and a search command to
support the other teams’ needs. That doesn’t sound like much fun.
Instead, we can decompose these capabilities into several individual
commands, and use Cog’s pipelines to get us what we want. Instead of
invoking recent_tweets_with_stats, we’d instead use
recent_tweets |
stats
, which would then pave the way for tweets_mentioning
"@support" | stats and tweet_search our_product | stats, and
indeed, getting statistics for any stream of tweets you could think
of.
6.11.2. A recent_tweets Command
In order to do this, though, we need to take a look at how Cog commands
can receive input from other commands. Though we could start directly
with writing the stats command itself, illustrating how it works by
piping the output of our existing tweet command into it, that won’t
actually be very exciting; it’s highly doubtful that we’re going to get
any retweets or favorites to a tweet a second after we send it. Instead,
we’ll start with a recent_tweets command that can generate
multiple tweets for our pipeline.
For brevity’s sake, with this command, we’ll shift gears from our “wrap existing commands for Cog” approach, and just write this script as though it were destined for Cog and only Cog. Of course, a bundle can have a mix of these commands, with some being custom Cog code, and others being wrapped pre-existing programs.
``recent_tweets`` Cog Command.
1 2 3 4 5 6 7 8 9 10 11 12 13 14 15 16 17 18 19 20 | #!/usr/bin/env ruby
require 'bundler/setup'
require 'twitter'
require 'json'
account = (ENV['COG_OPT_AS'] ? ENV['COG_OPT_AS'] : ENV['TWITTER_DEFAULT_ACCOUNT']).upcase
client = Twitter::REST::Client.new(
consumer_key: ENV["TWITTER_CONSUMER_KEY_#{account}"],
consumer_secret: ENV["TWITTER_CONSUMER_SECRET_#{account}"],
access_token: ENV["TWITTER_ACCESS_TOKEN_#{account}"],
access_token_secret: ENV["TWITTER_ACCESS_TOKEN_SECRET_#{account}"])
tweets = client.user_timeline(count: 5).map do |tweet|
{message: tweet.full_text, url: tweet.url}
end
puts "COG_TEMPLATE: tweet"
puts "JSON"
puts JSON.generate(tweets)
|
Annotations by line number:
Line 7 We’ll take care of the account switching in Ruby, instead of in a
shell script as we did for the tweet command earlier.
Line 14 Here we call the client’s API method that retrieves tweets from our authenticated user. As called here, this will result in no more than 5 tweets. This is configurable in the API client we’re using, however; a refinement of this command could involve accepting an optional number of tweets to retrieve.
Line 18 As before, we specify our template to use. Notice, however, that
we’re using the same template as our earlier tweet command. This
is intentional; we’re generating the same “shape” of data, and so
it’s natural that we’d template it the same way. A command can use
any template within its own bundle.
Line 20 Here we generate the JSON string to send back, but notice this time
we’re sending back an array of objects; in our tweet command, we
only sent back a single object.
Now that we’ve got a source of tweets, let’s see how we can process them in a downstream command.
6.11.3. Tweet Statistics: Favorites and Retweets
We’re ready to tackle our stats command now. Once again, our
twitter library has the code we need. We’ll also write this as a
“pure Cog” command, like we did for the recent_tweets command.
Twitter ``stats`` Command.
1 2 3 4 5 6 7 8 9 10 11 12 13 14 15 16 17 18 19 20 21 22 23 24 25 26 27 | #!/usr/bin/env ruby
require 'bundler/setup'
require 'twitter'
require 'json'
account = ENV['TWITTER_DEFAULT_ACCOUNT'].upcase
client = Twitter::REST::Client.new(
consumer_key: ENV["TWITTER_CONSUMER_KEY_#{account}"],
consumer_secret: ENV["TWITTER_CONSUMER_SECRET_#{account}"],
access_token: ENV["TWITTER_ACCESS_TOKEN_#{account}"],
access_token_secret: ENV["TWITTER_ACCESS_TOKEN_SECRET_#{account}"])
tweet = if ENV['COG_ARGC'] == "1"
ENV['COG_ARGV_0']
else
tweet = JSON.parse(STDIN.read)
tweet["url"]
end
tweet = client.status(tweet)
puts "COG_TEMPLATE: stats"
puts "JSON"
puts JSON.generate({message: tweet.full_text,
favorites: tweet.favorite_count,
retweets: tweet.retweet_count})
|
Annotations by line number:
Line 7 For this command, it doesn’t matter what account we use (i.e., there
will be no --as option). We’ll just use the default one.
Line 14 Though we’re talking about processing input from previous pipeline stages, we shouldn’t require that (otherwise our command could never be called on its own, because there would be no previous stage to feed it!). If our command is passed an argument (in this case the URL of a tweet), then that is what it will operate on.
Line 17 On the other hand, if we don’t receive an argument, we’ll read
standard input as a JSON map, and extract the url field from it.
Remember, we’re handling the case where we’re receiving a map that
looks like what our tweet command produces.
Line 21 This call simply “rehydrates” a Ruby tweet object from the URL. From
this we can extract the number of favorites and retweets the tweet
has. We’ll output plain text, just as we did in our original
tweet.rb script.
Let’s add these new commands to our bundle, install it, and give them a try.
Final Bundle Configuration.
1 2 3 4 5 6 7 8 9 10 11 12 13 14 15 16 17 18 19 20 21 22 23 24 25 26 27 28 29 30 31 32 33 34 35 36 37 38 39 40 41 42 43 44 45 46 47 48 49 50 51 52 53 54 55 | ---
cog_bundle_version: 4
name: twitter_example
description: Interact with Twitter
version: 0.0.6
docker:
image: cog-book/twitter
tag: latest
permissions:
- twitter_example:tweet
commands:
tweet:
description: Send a tweet!
executable: /home/bundle/tweet_cog_wrapper.sh
arguments: "<message>"
rules:
- when command is twitter_example:tweet must have twitter_example:tweet
options:
as:
description: the account to tweet from
type: string
required: false
short_flag: a
recent_tweets:
description: Last 5 tweets sent from this account
executable: /home/bundle/recent_tweets.rb
options:
as:
description: the account to tweet from
type: string
required: false
short_flag: a
rules:
- allow
stats:
description: Favorites and retweets
arguments: "[tweet_url]"
executable: /home/bundle/stats.rb
rules:
- allow
templates:
tweet:
body: |
~each var=$results~
~$item.url~
~end~
stats:
body: |
| Tweet | Favorite Count | Retweet Count |
|-------|----------------|---------------|
~each var=$results~
|~$item.message~|~$item.favorites~|~$item.retweets~|
~end~
|
Annotations by line number:
Line 24 Add the metadata for the recent_tweets command. Remember to add
the as option!
Line 35 Here’s the metadata for the stats command. This command takes no
options, but we do want to indicate that it can take an optional
tweet_url argument, for use outside of pipelines.
Line 48 Here’s the new stats template. This will actually generate a nice
table from our results. Templates can have conditional logic, so we
could modify this to display differently if we’re only given a single
tweet. What we have will work in all cases, however.
Once we rebuild our Docker image and install the bundle, we can finally
test it all out. First, let’s take a look at recent_tweets.
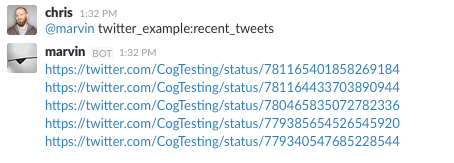
Running the recent_tweets Command
Let’s take a look at how the stats command behaves when we supply a
single tweet as an argument.
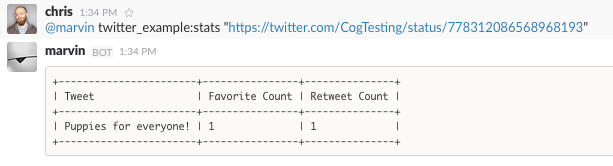
Running the stats Command for a Single Tweet
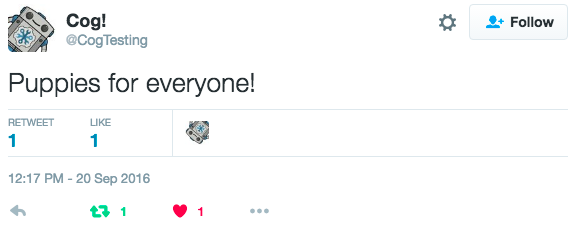
A Retweeted, Favorited Tweet
Not bad! Now, let’s take a look at it when we feed it multiple tweets in a pipeline.
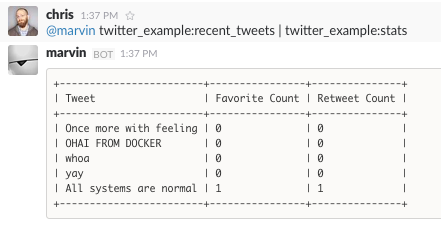
A Tweet Pipeline
Let’s dig into what’s going on behind the scenes. You might have noticed
that our recent_tweets command generated an array of tweet objects,
but that our stats command accepted just a single tweet object for
input. However, it seemed to process multiple tweet objects just fine.
The explanation to this lies in the Cog server. Cog accumulates all
output it receives into a single flat list, and then doles this output
one-by-one to the command in the next stage of the pipeline (if you’re
familiar with functional programming, Cog acts a bit like a map
operation processing pipelines). By default, commands can just assume
they’ll receive a single object to act upon, which makes them simpler to
implement.
Note
Though most commands can be implemented like our Twitter stats
command, operating on a single input object, there are some kinds of
commands that must operate on multiple inputs at once; think of
commands like filter, sort, min, max, and so on.
These kinds of commands can be implemented for Cog, but they behave
a bit differently. This is an advanced topic which we’ll describe
later.
6.12. Error Handling
If we try to execute our recent_tweets command (or indeed, any of
these commands we’ve been working on) with incorrect authorization
tokens, our commands will fail, but Cog will present us with a nicely
formatted error message. We don’t need to write any code in our command
to get that behavior; Cog gives it to us for free, which is nice. We
also get a rather ugly Ruby stack trace in that error message, which is
quite as nice. We’ll now take a look at how we get this behavior, and
how we can intentionally manipulate it.
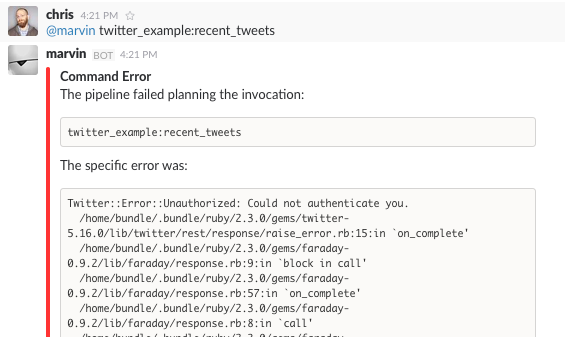
Command Failure with Stack Trace
If you’ve ever done any command line scripting, you’ll likely be familiar with the concept of “exit codes”. Essentially, these are numerical codes that indicate whether a program exited successfully or with an error (and if so, which error). An exit code of 0 is regarded as successful, while the numbers 1 and higher indicate errors. The same holds for Cog commands. All our successful commands finished executing on our Relay with an exit code of 0. Our failure to authenticate with Twitter actually raised an exception which we did not catch in our code, which ultimately ended up with our command failing with an exit code of 1. The stack trace that shows up in the error message was actually output on standard error, which Relay is also monitoring. If a command exits with a non-zero exit code, Relay captures the standard error stream of the command and sends that back to Cog, with an indication that the command has failed. Cog’s internal processing then takes over to render that as the error message we see in chat.
With this knowledge, we now know how we can control command errors.
Let’s update our recent_tweets.rb script and see how we can hide
that ugly Ruby stack trace and make a more friendly error message for
our users.
Adding Custom Error Handling to the ``recent_tweets`` Command.
1 2 3 4 5 6 7 8 9 10 11 12 13 14 15 16 17 18 19 20 21 22 23 | #!/usr/bin/env ruby
require 'twitter'
require 'json'
begin
client = Twitter::REST::Client.new(
consumer_key: ENV["TWITTER_CONSUMER_KEY"],
consumer_secret: ENV["TWITTER_CONSUMER_SECRET"],
access_token: ENV["TWITTER_ACCESS_TOKEN"],
access_token_secret: ENV["TWITTER_ACCESS_TOKEN_SECRET"])
tweets = client.user_timeline(count: 5).map do |tweet|
{message: tweet.full_text, url: tweet.url}
end
puts "COG_TEMPLATE: tweet"
puts "JSON"
puts JSON.generate(tweets)
rescue Twitter::Error::Unauthorized
STDERR.puts "Could not authenticate with Twitter API; check your authentication tokens!"
exit 1
end
|
Annotations by line number:
Line 6 Since our command was initially failing due to an uncaught exception,
we’ll wrap our code in a begin/rescue construct.
Line 20 When we have bad tokens, the code will throw a
Twitter::Error::Unauthorized exception. We’ll explicitly handle
that scenario here. You can create as many rescue clauses as
there are specific exceptions you’d like to deal with, or you could
just have a “catch-all” rescue clause; it’s up to you.
Line 22 After we output a custom error message on standard error, we quit the program with a non-zero exit code.
Now, when we run the command with bad tokens, we’ll get a much nicer output.
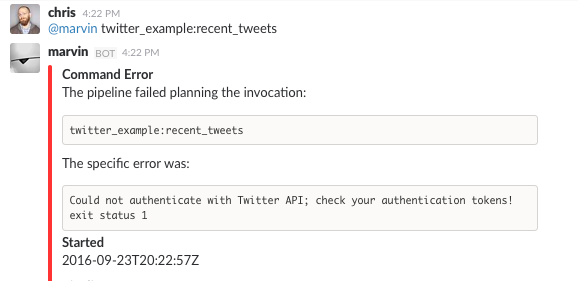
Revised Error Output with Custom Message
6.13. Logging
When developing a command, not everything will work out the first time.
Often, one of the simplest ways to figure out where your code has gone
wrong is by tracing it using logging statements. Cog commands support
this using the command response attributes COGCMD_DEBUG,
COGCMD_INFO, COGCMD_WARN, and COGCMD_ERROR. Emitting a line
starting with these flags (followed by a colon) will result in the
remainder of the line being sent to Relay’s log file at the specified
logging level.
You are free to interleave “real” output with logging output like this
without worry; Relay will keep them separate. Only your “real” output
will make it to Cog, while the logging information will only show up in
the log file. The only exception to this is with the JSON reponse
attribute. Once that attribute has been emitted, everything that follows
on standard output must be a legal JSON string.
Let’s modify our recent_tweets.rb script to see how this would look
in practice. We’ll ad a few logging messages at various levels to
illustrate.
Logging from a Cog Command.
1 2 3 4 5 6 7 8 9 10 11 12 13 14 15 16 17 18 19 20 21 22 23 24 | #!/usr/bin/env ruby
require 'twitter'
require 'json'
puts "COGCMD_WARN: Starting"
client = Twitter::REST::Client.new(
consumer_key: ENV["TWITTER_CONSUMER_KEY"],
consumer_secret: ENV["TWITTER_CONSUMER_SECRET"],
access_token: ENV["TWITTER_ACCESS_TOKEN"],
access_token_secret: ENV["TWITTER_ACCESS_TOKEN_SECRET"])
puts "COGCMD_INFO: Authenticated"
tweets = client.user_timeline(count: 5).map do |tweet|
puts "COGCMD_DEBUG: Tweet - #{tweet.full_text}"
{message: tweet.full_text, url: tweet.url}
end
puts "COGCMD_ERROR: Generating final output"
puts "COG_TEMPLATE: tweet"
puts "JSON"
puts JSON.generate(tweets)
|
And here is what it looks like in Relay’s logs once we execute the
command. Note that the unique pipeline ID (the P in parentheses) as
well as the complete command name (the C) are included for you
automatically.
Command Output in Relay Logs.
WARN[2016-09-23T14:10:18-04:00] (P: d3097cc6b413473780b9aa9596273586 C: twitter_example:recent_tweets) Starting
INFO[2016-09-23T14:10:18-04:00] (P: d3097cc6b413473780b9aa9596273586 C: twitter_example:recent_tweets) Authenticated
DEBU[2016-09-23T14:10:18-04:00] (P: d3097cc6b413473780b9aa9596273586 C: twitter_example:recent_tweets) Tweet - All systems are normal
DEBU[2016-09-23T14:10:18-04:00] (P: d3097cc6b413473780b9aa9596273586 C: twitter_example:recent_tweets) Tweet - OMG
DEBU[2016-09-23T14:10:18-04:00] (P: d3097cc6b413473780b9aa9596273586 C: twitter_example:recent_tweets) Tweet - OMG
DEBU[2016-09-23T14:10:18-04:00] (P: d3097cc6b413473780b9aa9596273586 C: twitter_example:recent_tweets) Tweet - This is from a Docker container
DEBU[2016-09-23T14:10:18-04:00] (P: d3097cc6b413473780b9aa9596273586 C: twitter_example:recent_tweets) Tweet - from docker
ERRO[2016-09-23T14:10:18-04:00] (P: d3097cc6b413473780b9aa9596273586 C: twitter_example:recent_tweets) Generating final output
6.14. Summary
In this chapter we’ve taken a look at the low-level underpinnings of the Cog/Command interface. Since this interface is based on the fundamental building blocks of environment variables, standard input, standard output, and exit codes, Cog commands can be written in any programming language.
We’ve also looked at techniques for developing commands and bundles, using existing programs you already use, or writing new Cog-specific commands from scratch. We’ve explored techniques for designing composable commands. Note that each one of these commands we wrote is very small; pretty much all they do is make a single API call! Yet from these simple commands, we can chain them together to make some exciting workflows.
We started with the simple idea of being to update our company’s Twitter status account during an incident, a usecase generally of interest to ops and engineering groups. However, as we went along, we started adding features that would be useful to other parts of the company; engineering probably doesn’t care a whole lot about how many retweets their status messages get, but marketing would care a lot about how many retweets a product release tweet got. ChatOps isn’t just for the ops and engineers; it’s something the whole company can use.